
You can apply the conditions in your template to entire stripes, structures in them, or to individual containers.
To apply a condition, first select the element (stripe/structure/container) on which you will apply the condition.

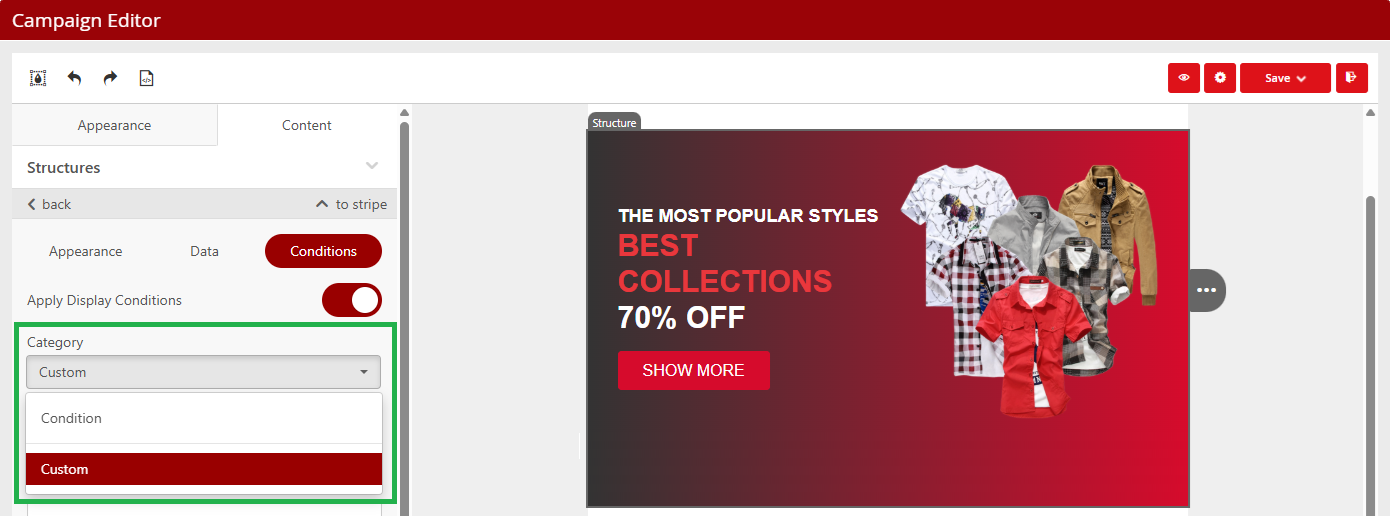
Then click on the “Conditions” button in the left menu of the editor to display the slider for activating “Apply Display Conditions” and activate the function by moving it to the right –> a menu for creating a condition will appear.
Then, in the left menu of the editor, click on the “Conditions” button to display the slider for activating “Apply Display Condition” and activate the function by moving it to the right –> the menu for creating a display condition will appear.
You can choose from 2 categories of conditions:
- Condition –> create a condition based on data stored in the recipient list that is attached to the campaign
- Custom –> create any (your own) condition
CONDITION
Here you can create a condition for displaying a given block in the same way as in the first step of Delivery capping or Recipient filtering, ie. add rules or groups of rules regarding data stored for recipients in the mailing list(s) attached to the campaign.

You can combine rules and their groups using the logical operators (AND and OR) to create more advanced and detailed filtering. In the picture above, 2 groups of rules were combined:
The 1st group contains 1 rule: Gender = Male
The 2nd group contains 2 rules, which are connected by the logical operator OR, ie. at least one of the rules applies: Custom field 1 contains the value/string |t-shirts| OR Custom field 1 contains the value/string |shirts|
There is a logical conjunction AND between the groups –> therefore both must apply simultaneously –> ie. the banner will be displayed to all men who have |t-shirts| or |shirts| or both in their custom field 1.
Once you have created the rule, complete the addition by clicking the "Apply" button. You can save the created rule for re-use by clicking on the “Save rules” button. Click the "Load rules" button to quickly apply saved rules to another element in any campaign in your account.
Please note that you will not find these rules in the Profile -> Queries menu, which stores rules that can be used in Delivery capping or Recipient filtering.
The application of a rule in a campaign is indicated by the
In the case of the CONDITION category, information about the applied rule can also be found in the left menu for working with conditions.
By clicking on the "Condition Applied" button, a window will appear for editing of the set conditions.

CUSTOM
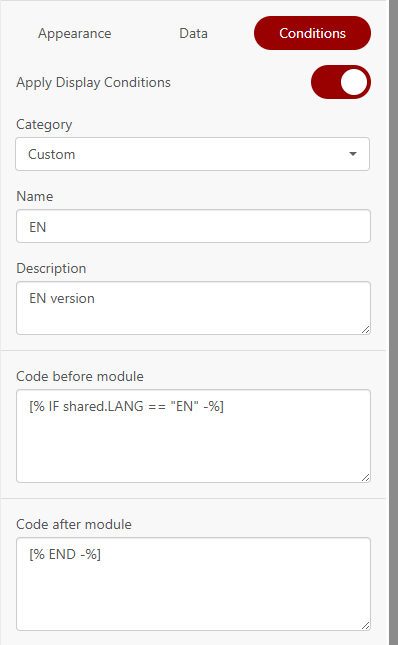
Here you can define your own conditions, e.g. if you want to "control" the display of an element based on the value of a selected parameter that you send in the API call. To apply the condition, you must fill in:
- Name – the name of the condition. If you use the same name for the condition when applying the condition to another element, the description field and codes before/after the module (see below) will be filled in according to the previously used condition with the same name
- Description – detailed description/explanation of the condition (optional field)
- Code before/after module – places to insert condition entries into which the element should be “wrapped
After filling in the mandatory fields, the condition will be saved automatically.
In this case, too, the application of the rule in the campaign is indicated by a pictogram  displayed next to the element to which the rule is applied.
In the case of the CUSTOM category, information about the applied rule can be found in the left menu for working with conditions. A window for possible editing of the set conditions will open by clicking on the “Conditions” button.
It is always necessary to keep in mind that the element to which you have applied the condition will be displayed ONLY to recipients who have met the condition for display, other recipients will not see it.
Of course, you can create multiple variations of content to display to different recipients, but you always need to keep in mind that all recipients see the correct content, to avoid a situation where the recipient will be shown multiple content variations, even though each recipient should receive only 1 content variation.
Therefore, before you send your campaign, we recommend that you carefully test that each recipient will see the correct content. You can use a campaign preview or send a test message to do so.
To deactivate (cancel) the conditional display (ie the given block will be displayed to all recipients), use the slider.
The display condition will be deleted, and if you want to reactivate the rule, you will have to recreate it (or upload from the saved rules).


