Inserting system links
Unsubscribe link
There is only one link that you unconditionally must have in your email and that is the unsubscribe link. If you do not insert this link in the email, it will always be inserted into the messages automatically by the system in default form (You can stop receiving this newsletter by clicking at the following link to Unsubscribe). Depending on how you edit your campaign, you can insert an unsubscribe link in the body of the message in different ways.
Campaigns based on Smart templates – inserting via editor:
1) Click the mouse cursor where you want to insert the link.
2) Click the Mailkit button 

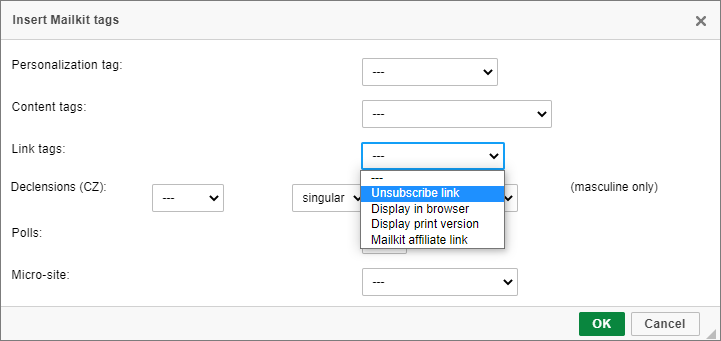
3) Select Link tags –> Unsubscribe link from the drop-down list and click OK.

4) An unsubscribe link will be inserted in the message body, at the location you specified in point 1. (The link will be in the language in which you are currently using Mailkit. You can easily edit it by double-clicking on the inserted text.)
Campaigns based on Content style templates – inserting via editor:
1) Click the mouse cursor where you want to insert the link.
2) Click the Mailkit button 

3) Select Link tags –> Unsubscribe link from the drop-down list and click OK.

4) An unsubscribe link will be inserted in the message body, at the location you specified in point 1. (The link will be in the language in which you are currently using Mailkit. You can easily edit it by double-clicking on the inserted text.)
Campaigns created in the Visual Builder – inserting via editor:
1) Use the mouse cursor to select the text in the message where you want to insert the link.
2) Click the

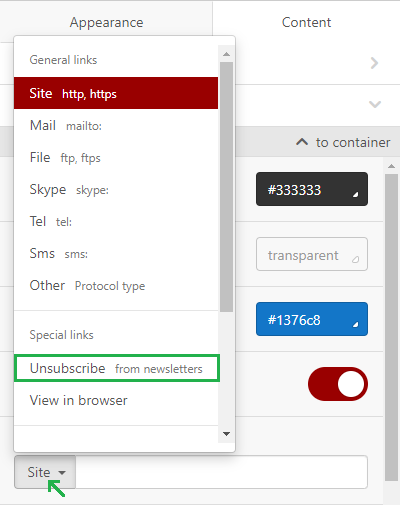
3) In the left main menu of the editor, click on "Site" and select "Unsubscribe" from the drop-down menu.

4) An unsubscribe link will be inserted in the message body, at the location you specified in point 1.
HTML code editing:
The Unsubscribe link is a regular "a href" link with the tag [SIGNOUT] instead of the url address:
Click to display in browser link
It is useful not only for graphical email, to give recipients the option to view the message in the browser. Mailkit will take care of this view, you don't have to save your email on your website or ftp, just enter the appropriate link.
Campaigns based on Smart templates – inserting via editor:
1) Click the mouse cursor where you want to insert the link.
2) Click the Mailkit button 

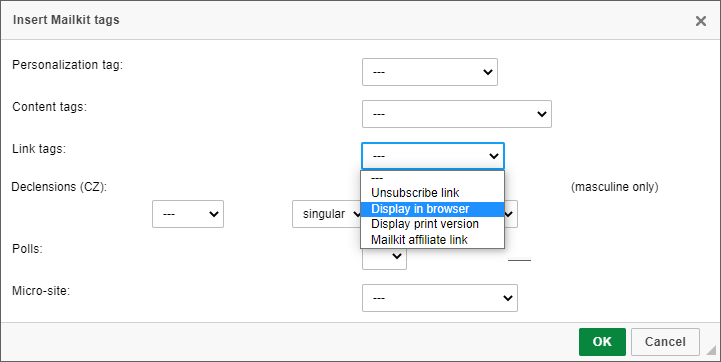
3) Select Link tags –> Display in browser from the drop-down list and click OK.

4) A Display in browser link will be inserted in the message body, at the location you specified in point 1. (The link will be in the language in which you are currently using Mailkit. You can easily edit it by double-clicking on the inserted text.)
Campaigns based on Content style templates – inserting via editor:
1) Click the mouse cursor where you want to insert the link.
2) Click the Mailkit button 

3) Select Link tags –> Display in browser link from the drop-down list and click OK.

4) A Display in browser link will be inserted in the message body, at the location you specified in point 1. (The link will be in the language in which you are currently using Mailkit. You can easily edit it by double-clicking on the inserted text.)
Campaigns created in the Visual Builder – inserting via editor:
1) Use the mouse cursor to select the text in the message where you want to insert the link.
2) Click the

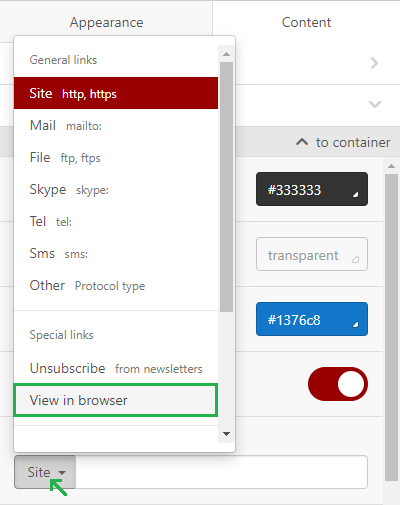
3) In the left main menu of the editor, click on "Site" and select "View in browser" from the drop-down menu.

4) A View in browser link will be inserted in the message body, at the location you specified in point 1.
HTML code editing:
The Display in browser link is a regular "a href" link again. In this case with the tag [PREVIEW] instead of the url address:
You can also set the web view to no longer display the link for displaying email in the browser. In this case use this condition:
Inserting and tracking common links
How does link tracking work?
Mailkit assigns a tracker to each link that is correctly inserted into the campaign. What is the tracker and what is it for? You can imagine the tracker as a control station. This is an intermediate stop in the recipient's way - from clicking on a link in the e-mail to when it reaches the destination url address. Thanks to this tracker, you can find out who clicked on the specific link in the message.You can find the results in the reports.
How to insert correctly the link in the body of the email?
Not only from an aesthetic point of view (to prevent your nice email from hurting a visible and ugly url address), but mainly because of the application of trackers to links, it is desirable that all links in the e-mail campaign be placed on text, button or picture. Why? To avoid causing the spam filter to evaluate your email message as a phishing attempt - the spam filter first looks at the text of the email, finds the visible link url there, then looks at where the link leads, that the link will point to another url address (to a tracker), it will be suspicious for him.
If you're preparing a campaign in the editor, always use the Insert / Edit link editor:

First, type the word (or insert the image), then mark the word (or image) with the cursor and click on the Insert/Edit link button to type the destination url address (ie. the address where the link will lead).
Correct form of links in email campaign:

Wrong form of links in an email campaign:


